WebGPU Snapshot Rendering
Snapshot rendering is a new rendering mode available starting with Babylon.js v5.0. Only WebGPU supports it: activating this mode in WebGL has no effect.
Description
The snapshot rendering (SR) feature improves performances in some specific scenarios described below.
It works by recording the draw calls during one frame and by replaying this recording for all subsequent frames. So, the scene should be mostly static for this mode to work as expected. Note that this mode can be enabled or disabled whenever you want. So, if at some point something must change in the scene that is not supported by SR, you can disable the mode, apply the changes and re-enable SR afterwards.
Note that the performance improvement is on the javascript side only: the GPU perf will be more or less the same with or without SR enabled (you could still see some small GPU perf improvements, though, depending on the browser).
The perf improvements can be quite large, especially when using the fast SR mode (see below for explanations regarding the SR modes). Here are some figures collected with the first PG listed in the Examples section:
| SR disabled | Standard mode | Fast mode |
|---|---|---|
SR disabled 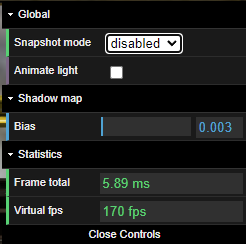 | Standard mode  | Fast mode 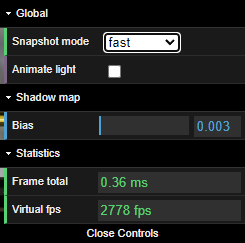 |
Enabling snapshot rendering mode
The snapshot rendering mode is enabled by setting:
engine.snapshotRendering = true;When doing this, the next frame will be recorded (and of course also displayed as usual!) and the recorded snapshot will be replayed in all subsequent frames until you either disable the mode or use engine.snapshotRenderingReset(). If calling the latter, a new snapshot will be created the next frame that will replace the current snapshot.
Calling engine.snapshotRenderingReset() is the way to apply changes not supported by the SR current mode (see available modes in the next section): apply your changes and call this function. That will destroy the current snapshot and instruct the system to create a new snapshot by recording the draw calls of the next frame (which will contain your changes). In effect, it is the same than doing engine.snapshotRendering = false; engine.snapshotRendering = true;. The first assignment will stop/destroy the current snapshot and the second will ask the system to record the draw calls when rendering the next frame. Of course, for this to work, your changes should be in effect right at the next frame! If, for eg., you import a new mesh, it will probably take more than a frame to be added to the scene. So, you should make sure to call engine.snapshotRenderingReset() once you know the next frame will render the scene with the new state.
Standard and Fast modes
There are two different modes available when SR is enabled:
- Standard mode (
Constants.SNAPSHOTRENDERING_STANDARD). In this mode, the uniform buffers are still updated so some kind ofdynamicityare still supported: you can update some parameters of a material, for eg, and it will work. - Fast mode (
Constants.SNAPSHOTRENDERING_FAST). In this mode, only the scene uniform buffer is updated automatically by the system (meaning moving the camera works as expected). You can still update the uniform buffers of meshes "by hand", so moving/rotating meshes are also supported (see examples below).
Whatever the mode, as the draw calls of a given frame are recorded and replayed for all subsequent frames, adding or removing meshes won't work. You will need to disable the SR mode if you want to add/remove meshes and re-enable it afterwards.
Caveats
Always set alwaysSelectAsActiveMesh to true
Given how SR works, you will probably always want to set alwaysSelectAsActiveMesh = true to all your meshes because if this property is false (default value) and the mesh is not displayed when recording the snapshot, no draw calls will be recorded for this mesh, meaning that if you move the camera later on that should make this mesh visible, it still won't be visible.
Statistics in the Inspector
In the fast SR mode, most of the regular javascript code is skipped, so the statistics display by the inspector in the COUNT section won't be accurate: all the Active XXX counters as well as Total vertices will stay at 0.
When to use
It's hard to list everything that will work/won't work depending on the mode, so the easiest way to use this new feature is to enable it and see if everything works as expected once enabled (try first fast mode, then stardard mode). As explained above, if you need to update something at some point in time and the current SR mode can't handle it, you can always disable SR, apply the changes and re-enable SR.
eCommerce sites may greatly benefit from this feature as the scene is normally quite small with everything visible on screen. Also, there's generally not a lot dynamicity and when something needs to be updated it's a "one shot" update, so either calling snapshotRenderingReset or disabling temporarily the feature should work.
Enable the snapshot rendering mode at the right time
Make sure everything is ready in your scene to be rendered the next frame after you set engine.snapshotRendering = true! Indeed, once you set the snapshotRendering to true, the next frame is recorded and replayed afterwards. If some textures (for eg) were not ready at that time, the mesh won't be rendered in the frame that is recorded and so won't never be visible. You should probably always set engine.snapshotRendering = true inside a scene.executeWhenReady(...) callback.
Examples
Here's a PG that demonstrates using the snapshot rendering feature: Snapshot rendering
You can choose to disable or enable standard / fast SR mode. Depending on the mode, you will see the javascript time it takes to render a frame (Frame total) and the virtual fps (the fps you would have if there was no GPU rendering / the fps was not capped by the browser - it is simply 1000/Frame total).
In fast mode, animating light / updating the bias would not work for the reasons explained above. When you update:
- the bias, the PG calls
engine.snapshotRenderingReset()so that the bias is taken into account for the next frame and the snapshot is recreated at that time too - the Animate light checkbox, the PG switches to standard SR mode until you uncheck the box. It happens moving the light does work in standard SR mode: had it not work, we would have switched to SR disabled mode instead.
Note also that in the fast SR mode you must handle the update of the position of the sky yourselves because the uniform buffers are not updated by the system (except for the scene buffer). See the Advanced usages for the fast mode section for more detail.
Here's another PG using the glow layer: Snapshot rendering with glow layer
This PG is using the standard SR mode because the fast mode does not work (try to set the fast mode and see for yourself - however, see next section for a way to make it work). Also, when a resize kicks in, we need to disable the SR mode and re-enable it only when the glow layer had time to recreate its internal texture with the new size. That's why we use a setTimeout(..., 1) to re-enable the SR mode.
Advanced usages for the fast SR mode
The fast SR mode is the most interesting mode as your scene can be handled several order of magnitude faster than with SR disabled (or even using the standard SR mode).
Here are a number of ways to overcome some of its limitations.
Updating position/rotation/scaling/visibility properties of meshes
The world matrix and the visibility property of a mesh is stored in a specific Mesh uniform buffer. In the fast SR mode, this uniform buffer is not updated automatically, so if you update the position/rotation/scaling or the visibility property it won't have any effect on the screen.
You should call mesh.transferToEffect(world) to update the uniform buffer.
Here's an example: Update mesh matrix in fast SR mode
Using the glow layer
As demonstrated in the Examples section above the glow layer does not work out of the box in the fast SR mode. With a bit of manual work it can be made to work, though:
Use glow layer in fast SR modeYou will need to call the updateEffectLayer method each time the camera or the meshes of the glow layer move/rotate. If only a subset of the meshes are in the glow layer, you can change the method to loop through this reduced list instead of looping over all the meshes of the scene.
Animating bones
To make skeleton animations work in the fast SR mode, you simply need to call the prepare method on the skeletons you want to animate: