Export Pipeline to glTF
General Concepts
Babylon.js supports the glTF specification for digital assets and can load the format into any scene. The digital asset can contain any combination of meshes, materials, textures, skeletons, animation data, or morph targets at a minimum. The question would be, at this point, what is the best method to export the digital asset created in a Digital Content Creation (DCC) tool to a .glTF file? Each DCC tool that supports the glTF format will have their own procedures for exporting - and possibly importing – .glTF files so the path varies from one package to the next. This section will detail some of the main concepts to keep in mind for the exporting to the glTF format from the tools we see used most in the community.
The first concept that applies to almost all of the export paths is that you may have a choice between exporting a .glb file and a .glTF file. Put simply, the difference between the two formats is how the files needed to render the asset are stored on disk.
Exporting as a .glb file will write a single compressed file that contains the .glTF json file, the mesh binary file, and all textures. This format is very useful for organizing and sharing your assets since everything is contained in a single file.
Exporting as a .glTF file will write a collection of individual files consisting of the .glTF json file, a mesh binary file, and all textures referenced in the scene materials. This format is very useful if you want to open or edit the individual textures or .glTF json. It is important that all files written for a glTF export remain in the same relative location to the .glTF file or the asset may fail to load due to broken links to the mesh or textures. The challenge with this option is there are no visible naming conventions between the individual files that make up an asset. A directory containing several .glTF files could prove problematic in discerning which files belong to any given glTF asset without opening each one.
Blender
Blender is one of the more common DCC tools used by our community due to the fact that it is an open source project which is free to use. Blender was an early adopter of the glTF specification and boasts both export and import for glTF files. When setting up your export, there are several options that are available that will affect how your asset behaves which we will briefly break down.
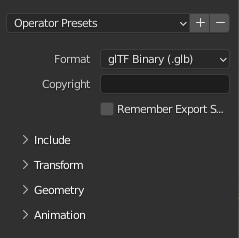
To start, choose File > Export > glTF 2.0 (.glb/.gltf) to open the export options window. You can save as a .glb file, a .gltf file, or an embedded .glTF file. An embedded .glTF written by the Blender exporter will not write the standard binary file containing data like vertex list, normals, or animations. Instead it writes this information in the .glTF json file. This makes the data for the asset easy to manipulate, but the resulting asset size will be larger since writing that data into a binary would result in a smaller overall footprint.
Format
Once you have the export window open, choose the export format from the format drop down. You can include a text string for copyright as well as a checkbox to save the export settings for the next time you export your asset.
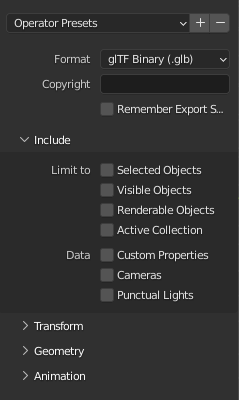
Include
The first set of Include options allow you to control what parts of your scene will be exported based on what is selected, what is visible, what is renderable, or what is in the active collection. You can also use combinations of options to drill down further. For example, you could choose to export only visible, selected objects in the active collection and ignore anything that does not meet those requirements.
The second set of Include options enable export of scene custom properties, cameras, or punctual lights. These options will add some scene-level elements to the export outside the standard mesh, materials, and textures. Some of these options will require extensions to the glTF 2.0 core specification, but if the option is checked the exported .glTF file will include any needed references.
Transform
The options for transform are the simplest to understand. The glTF specification defines +Y as up in the scene coordinate system. Blender’s coordinate system defines +Z as up, which would result in your asset being in an incorrect orientation when rendered. Checking this option will automatically convert the Blender coordinate system to match the glTF coordinate system and keep your asset in the same orientation as it was authored.

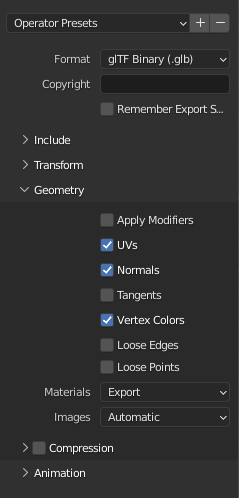
Geometry
The Geometry options in Blender give you some control over what is written into the .glTF file. You may want to enable or disable these options to control the size of the glTF file or to pass specific data from Blender to the renderer to control the asset's render at runtime. A good example of this is tangent data. There are times when you may want to include tangent data for specific shaders or if your tangents are authored in a particular way. If this data is present in the file the renderer won't calculate it at runtime. On the other hand, if you don’t mind the renderer calculating the tangent data at runtime, excluding tangent data from the export will make the resulting .glTF file smaller.
Apply Modifiers
Apply Modifiers does exactly what it implies in that it bakes all modifiers into mesh object. Note, however, that it also prevents the exporting of shape keys. So if you want to use shape keys in your asset, you should leave this unchecked and manually apply any modifiers you use as any unapplied modifiers will not export.
UVs, Normals, Tangents, and Vertex Colors
Enable any of these options to include that data type into the glTF export.
Loose Edges and Loose points
Loose edges and loose points will export as lines and points respectively, based on the definition for lines and points as meshes in the glTF specification.
Materials
Materials can be exported as you normally would or not at all. There is also a third option for exporting materials as a placeholder. This means that the materials themselves will not be exported - and thus no textures are exported either - but that there is material slot information written into the .glTF file with no material definition.
Images
Images can be exported either automatically, matching image format - .png or .jpg - of the original file. You can also override the orignal image format to save all images without an alpha channel as .jpg files. Usually, a .jpg file will be smaller than a .png file due to the compression used. However, the .jpg compression will cause problems if you are using a channel-packed image - for example an image with AO in the R channel, Roughness in the G channel, and Metallic in the B channel. The lossy compression of JPEG will quantize pixel values across all three channels which will result in pixel values from your individual packed textures being changed based on the pixel values of the other channels. In the case of channel-packed textures, you will want to make sure export .png files since that compression scheme isn’t lossy and does not compress data across channels.
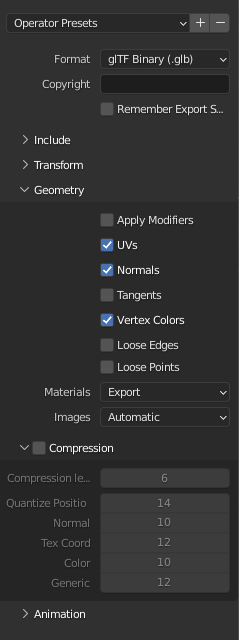
Compression
The Compression option is exactly what it sounds like. This option gives you the ability to quantize data types in the exported file to reduce the overall file size. You can set a general compression ratio or you can set quantization levels for specific data types with higher numbers reflecting more quantization and a smaller file size. Obviously, you will want to test out the quantization levels to find the best trade-off between file size and the authored design of your asset.
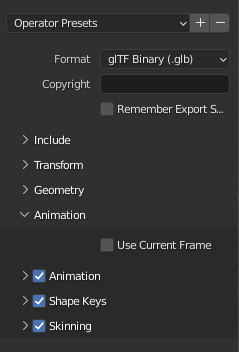
Animation
The Animation options allow you to enable or disable entire sections of the animation data. Expanding each of those sections will give you more fine control over individual options that pertain to each type of animation data.
Use Current Frame
Use current frame allows you to specify the default frame you want your asset to be exported in. This is helpful if you want your asset in a particular pose when it is loaded. Otherwise, the file will be exported in the rest pose of the rig.
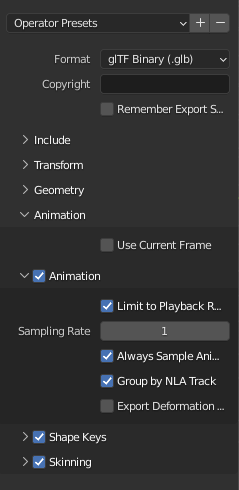
Limit to Playback Range
Limit to Playback Range will clip exported animations only to the selected playback range. This can be useful if you want to split your animation timeline between several files to load as needed.
Sampling Rate
Sampling Rate is an optimization trade-off for export. The value for Sampling Rate represents how often the animation curve is sampled and baked. Using a sampling rate of 1 will sample the curve and write a keyframe on every frame of the animation where a rate of 3 will sample the curve and write a keyframe every three frames. If you use a sampling rate other than 1, the animation curve will be sampled that that interval regardless of where the keyframes were authored on the animation curve. This means that your animation will change slightly if the curve is sampled less often than you've placed keyframes. The larger the value set for sampling rate, the more your animation will change as your keyframes are averaged by the new sampling rate. This does save on file size, but at the cost of accuracy in your animation curves. Conversely, a low sampling rate produces a more precise export of your animation curve at the cost of a larger file size.
Always Sample Animation
The Always Sample Animation parameter works in concert with the sampling rate. Enabling this option will write additional animation curve data into your export. In the case of a bone in an armature, if you set keys on rotation, but nothing on translation or scale normally the export will only include the rotation data. Enabling Always Sample Animation will write keyframe data on that bone’s translation and scale parameters even though none was autored on the bone. Enabling this parameter on a complex armature can potentially have a large impact on file size due to the amount of extra data exported that was not originally keyed. Best practice here is to try your export without this parameter checked and only use it if the resulting animation does not look right. If your animation does not need the extra animation data, there is no reason to export it.
Group By NLA Track
Group By NLA Track is used to separate nonlinear animation tracks into their own animation clips. This can be useful if you author individual animations using the nonlinear animation graph rather than authoring your animations sequentially in the timeline. Working this way can help with organization by labeling your individual animations. You can simply enable Group by NLA Track at export time to write each track into its own clip. If you need to blend the tracks in your nonlinear animations together to get your desired motion, disabling the Group by NLA Track will write the animation data based solely on the timeline and not individual tracks.
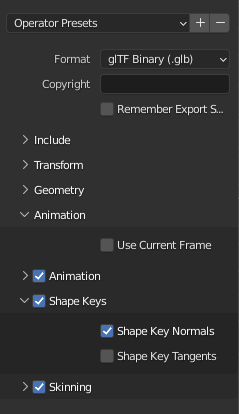
Shape Keys
Enabling the Shape Keys parameter is required if you have any shape key animation in your scene. If this parameter is disabled, no shape key animation will be exported into your file. If the parameter is enabled, you also have the choice of exporting Shape Key Normals and Shape Key Tangents. Including the normals and tangents of your shape keys will increase the exported file size, so only include them if you need to. For the most part, you can probably forego the Shape Key Tangents parameter and let the renderer calculate them at run time. In the case of the Shape Key Normals parameter, you will likely want to keep this enabled unless your shape keys do nothing to change the surface normals of your mesh. If that is the case, you can disable this parameter as well.
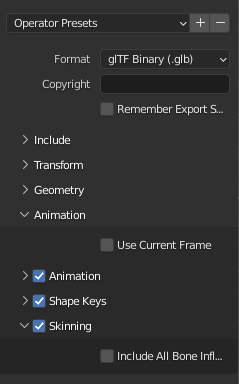
Skinning
The Skinning parameter needs to be enabled to export animation on any skinned mesh - specifically any mesh driven by an armature. If this parameter is disabled, any skeleton and skinning information present in your scene will be excluded from the export. If you want to export only the mesh attached to an armature, disabling this parameter will easily allow it. With the Skinning parameter enabled, you get access to the Include All Bone Influences parameter. This parameter, when enabled, will export weights from every bone that influences every vertex. Typically, you do not want more than 4 bones to influence any vertex as individual glTF renderers may not support more than four bone influences per vertex. Babylon.js does support more than four bones influencing a single vertex, but if you need your glTF to render consistently across different renderers it would be advisable to stick to only four bone influences per vertex. Leaving this parameter unchecked will ensure you have no more than four bone influences per vertex, even if your authored file does.
AutoDesk 3ds Max and Maya
The Autodesk applications, 3ds Max and Maya, are at slightly different points on the roadmap to exporting files conformant to the glTF 2.0 specification. Currently, 3ds Max has a path to export to glTF, but it does not have a full implementation of the glTF specification so you may not find that all features of the format are suppored through that export path. Maya, on the other hand, does not have an export path to glTF at the moment. The export pipeline supporting the full glTF 2.0 specification is on the roadmap for future development for both applications, but we have no visibility when that will land in the products.
The Babylon.js glTF Exporter
To fill the immediate need until Autodesk ships their own export pipelines, the Babylon.js exporter is available for both 3ds Max and Maya. The exporter can export your 3ds Max or Maya scenes to a .glTF file, a .glb file, or a .babylon file. The last one is a scene format for Babylon.js which is beyond the scope of this section but is well documented in the .babylon File Format section. Our glTF exporters are available for 3ds Max versions 2015–2023 and for Maya versions 2017–2023. These exporters will continue to be available for versions up to 2023 in perpetuity, but for now we are putting the development of future versions of the exporters on hiatus so we can invest in other areas of the engine.
If in future versions of AutoDesk software you find that glTF support has still not been added, you do still have a few options. The most straight forward path would be to continue using the 2023 version of either 3ds Max or Maya to export your glTF assets. You would need to move your scene back to a previous version of the application through an intermediate format. One option is through the USD format. There are some initial implementations of USD import in the 2023 versions of the applications so you may be able to transfer an intact scene between versions depending on the features of your scene.
If you can't use the USD format for any reason, you can always use FBX or Collada formats to move your assets to the application of your choice. There is some inherent extra work using these formats due to the limited nature of what can be written to the file based on what the format supports or how the format is implemented in the DCC tool.
If you decide on using a transition file to move your asset to a DCC tool that has an export path to glTF, you can choose whether to stay with 3ds Max or Maya version that is supported by the Babylon.js exporter, or move to an entirely different DCC tool that supports glTF export such as Blender, Substance Painter, Modo, or Houdini.
That said, let’s break down the options for the exporters. This document will be a quick overview as we already have more in-depth documentation about the exporters.
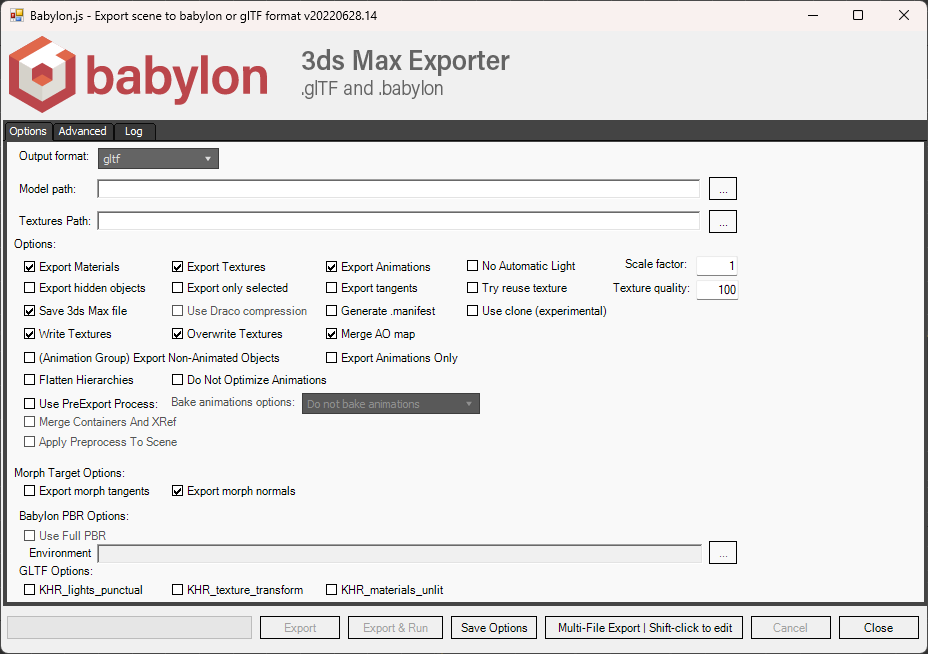
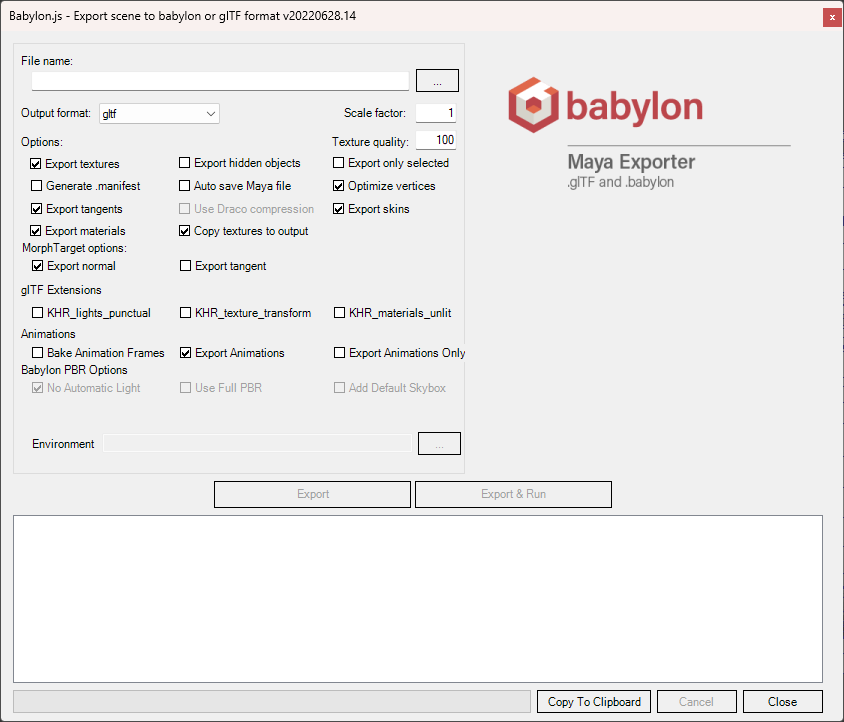
Common Parameters
There are some common parameters between both versions of the exporter. To make it easier to digest, we will explain those common parameters first and then handle the one specific to 3ds Max or Maya later.
Output Format
The Output Format is the file type you would like to save (.glb, .gltf, .babylon)
Model Path
Model Path is location to which you would like to write the exported file.
Export Textures
Export Textures determines if we should write textures used in the asset to disk. If saving a .glTF file over an older version, you may not need to overwrite textures if there were no changes. Disabling this option will shorten the time needed to export.
Export Animations
Export Animations determines if animation data should be written into the glTF. Disabling this parameter would allow a scenario like exporting a rigged mesh into a smaller file size if you planned to retarget animation from elsewhere and not use the animation authored in this asset.
Scale Factor
Setting a Scale Factor value other than 1 will result in the exported file being scaled by that value. This allows correction of scale inconsistencies between asset and scene at the export step rather than needing to scale the asset in the DCC tool or in code at runtime.
Export Hidden Objects
Export Hidden Objects allows you to export objects from your scene, even if they are hidden. Normally, hiding an object is a good way to exclude it from export, but there are times you may hide objects in your scene to make working on the scene more convenient. Enabling this option will allow you to export your entire asset without needing to unhide objects to retain your current working state.
Export Only Selected
The Export Only Selected option carries a lot of weight. As the name implies, only selected objects will be exported. That also means that any data on objects not selected will be excluded from export. For example, if you select only the mesh of a rigged character with animation and enable Export Only Selected, you will get the mesh only with no skeleton, skinning, or animation data - even if those options are enabled. If you want to use Export Only Selected, make sure you select all components of your asset such as mesh and skeleton to retain your skinned and animated asset in the export. This is, however, a good way to separate parts of your asset into its own file if needed. If you only wanted the mesh from a rigged character, for example, you don’t need to extract the mesh from your skeleton - just export with only the mesh selected and the exporter will separate it for you.
Export Tangents
Export Tangents is useful if you need to include your authored tangent data in the export instead of letting Babylon.js calculate the tangents for you at runtime.
Save 3dsMax/Maya File
The Save File option will run a save command on your scene when the file is exported. Use this option based on your personal pipeline prefernces as the export process does make the application think there was a change to the file. This means the scene will act as though there are unsaved changes in the file adding an asterix after the name in the header bar. For clarity, you may want to enable this option just to know any unsaved changes prompt does not pertain to a glTF export action.
Use Draco Compression
If you want to use Draco compression to compress your mesh, there are a couple of steps required first. To enable use of this option, you need to install Node.js and the glTF-pipeline to enable the option in the exporter.
Generate .manifest
Generating a .manifest file is only used when exporting in the .babylon file format. The .manifest file is needed for scene optimization by allowing assets to be loaded from the local IndexedDB of the browser rather than being loaded from the web.
Export Animations Only
Export Animations Only is exactly what it sounds like. This will export abstract meshes, skeletons, and animations for a file excluding meshes, materials, and textures. This is useful if you are splitting your assets between mesh files and animation files and is a normal pipeline in a studio with a team of 3D artists and animators. It is useful for letting multiple people work on the same asset at the same time, each tackling a portion like the mesh or a single animation clip. Once you have a file with just animation data, it's a simple process to retarget the animation in Babylon.js to the final mesh asset.
Export Morph Tangents
Export Morph Targets only applies if there are morph targets in the scene. If that is the case, tangent data from all morphs will be exported. Enable this option if you don’t want Babylon.js to recalculate the tangent data at run time.
Export Morph Normals
Export Morph Normals also only applies if there are morph targets in the scene. Use this option to export the normal data from all morph targets. You would normally want to export the morph target normals, but in a case where the morph target does not change the surface normals of the base mesh you can skip this data in your export. Doing so will reduce the file size of the export.
KHR_lights_punctual
KHR_lights_punctual is needed if you have any punctual lights – directional lights, point lights, or spot lights – in your scene that you want to export. The renderer will need to know how to handle the punctual lights in the scene - the job of the extension referenced in your .glTF file - to help render the scene correctly. If this option is enabled and you have no lights to export, the extension will not be referenced in the .glTF file.
KHR_texture_transform
KHR_texture_transform is needed if you have any transforms on any texture referenced in any material that uses options like tiling or offset value. Enabling this option will include a reference to the extension which will allow the renderer to apply the correct transforms to your textures. If this option is not enabled, your textures will render in their original state without any transforms applied.
KHR_materials_unlit
KHR_materials_unlit is needed if you have any unlit materials applied to your asset. Doing so will include a reference to the extension which will allow the renderer to use the correct shader for the unlit materials. If this option is not enabled, any materials you have designated as unlit will render as standard PBR materials in the renderer.