Instances
How to use Instances
Instances are an excellent way to use hardware accelerated rendering to draw a huge number of identical meshes (let's imagine a forest or an army).
Instances are built from a mesh with the following code:
// In this case we're loading our mesh from an external source.BABYLON.SceneLoader.ImportMesh("", "//www.babylonjs.com/assets/Tree/", "tree.babylon", scene, function (newMeshes) { var mesh = newMeshes[0]; // Make the "root" mesh not visible. The instanced versions of it that we // create below will be visible. mesh.isVisible = false; for (let index = 0; index < 100; index++) { var newInstance = mesh.createInstance("i" + index); // Here you could change the properties of your individual instance, // for example to form a diagonal line of instances: // newInstance.position.x = index; // newInstance.position.z = index; // See below for more details on what can be changed. }});A mesh can have as many instances as you want.
Each instance has the same material as the root mesh. They can vary on the following properties:
positionrotationrotationQuaternionsetPivotMatrixscaling
Note: related are thin instances, if you want yet more performances but with less control on each instance. See the dedicated page for further information.
Use Instances with Node Material
The Node Material is a powerful tool that allows creating shaders without having to write GLSL. To use a Node Material in a mesh with Instances, you need to add the Instances node to it so that the object is properly instanced:
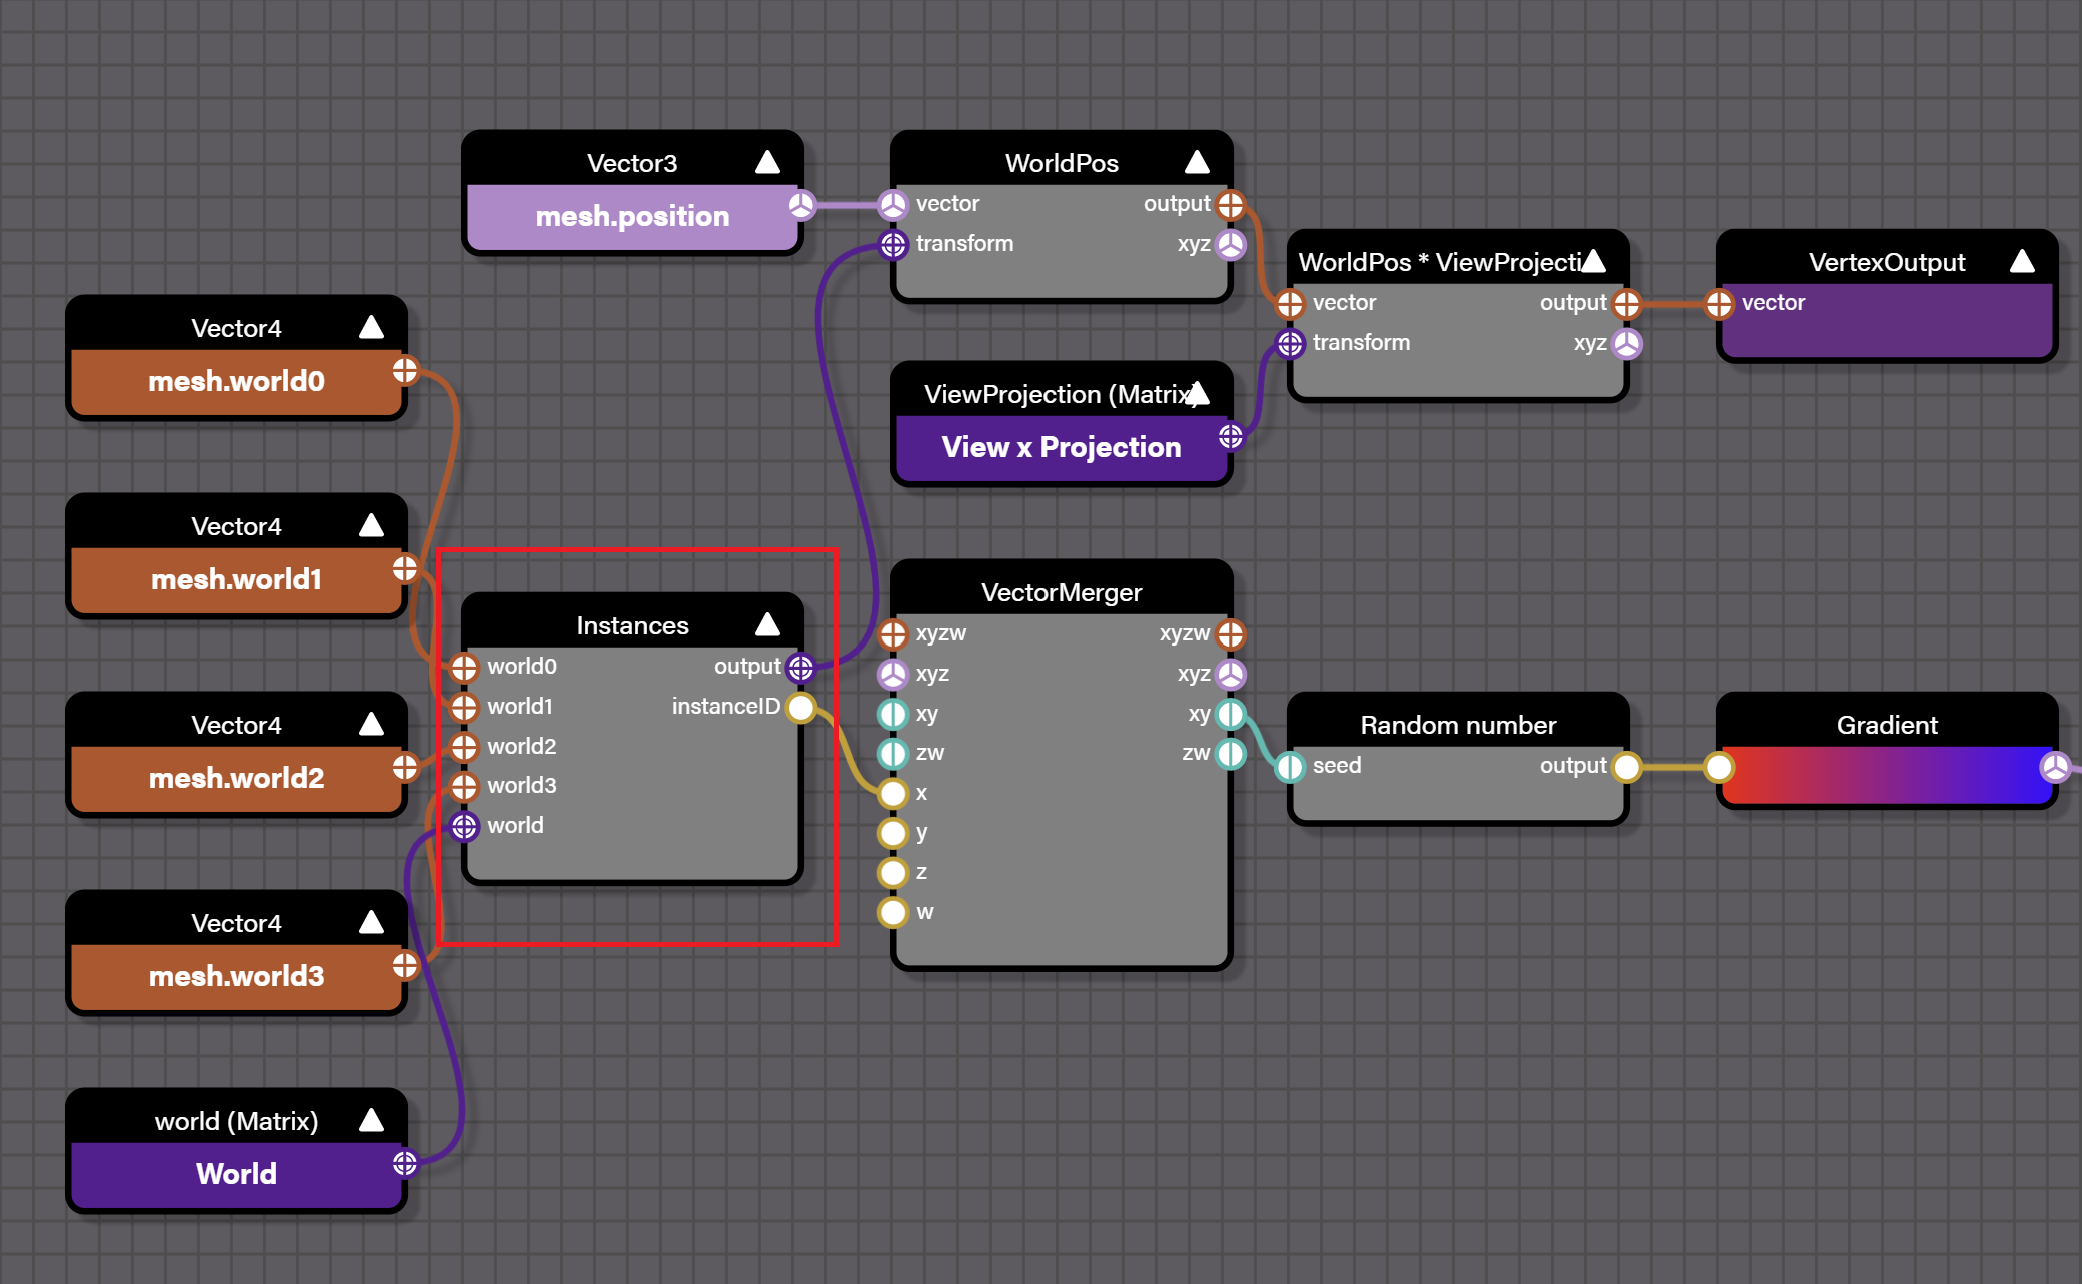
The Instances node also gives information on the instance number of the object, which can be useful to, for example, color each instance differently.
Using Node Material with InstancesInstancing a glTF object
When you instanciate a glTF object, you need to make sure that the new instance will be under the same parent or you need to remove the parent from the source object.
This is because every gltf file comes from a right handed world. To get it into Babylon.js left handed world, we are adding an arbitrary parent that is adding a negative scale on z.
So when instancing a glTF object you have to (either):
- Call
source.setParent(null) - Or call
newInstance.setParent(source.parent)
Custom buffers
You also have the opportunity to specify per instance values for any attribute. For instance (no pun intended), if you want to have a specific color per instance, you only need to provide a vertex buffer flagged as "instanceable" and fill it with a color per instance:
let instanceCount = 1000;let colorData = new Float32Array(4 * instanceCount);
for (let index = 0; index < instanceCount; index++) {  colorData[index * 4] = Math.random();  colorData[index * 4 + 1] = Math.random();  colorData[index * 4 + 2] = Math.random();  colorData[index * 4 + 3] = 1.0;}
var buffer = new BABYLON.VertexBuffer(engine, colorData, BABYLON.VertexBuffer.ColorKind, false, false, 4, true);box.setVerticesBuffer(buffer);
The last parameter of the VertexBuffer constructor is the one to set to true to flag it as instanceable.
Example: Custom Buffers Example 1
The other way is to register a custom buffer with registerInstancedBuffer:
mesh.registerInstancedBuffer("color", 4); // 4 is the stride size eg. 4 floats hereUsing this API, you can specify a new buffer that will be instancied. This means that each instance will have its own value. You can specify this value on the root mesh and on every single instance:
box.instancedBuffers.color = new BABYLON.Color4(Math.random(), Math.random(), Math.random(), 1);let instance = box.createInstance("box1");instance.instancedBuffers.color = new BABYLON.Color4(Math.random(), Math.random(), Math.random(), 1);The system will take care of updating the internal vertex buffer.
Example: Custom Buffers Example 2
If you want to use custom buffers in conjunction with node materials, you can access the instanced buffers color with the mesh.color block. Make sure you have added the Instances block to your graph and then the mesh.color block will reference the instanced buffers color assigned to the instance.
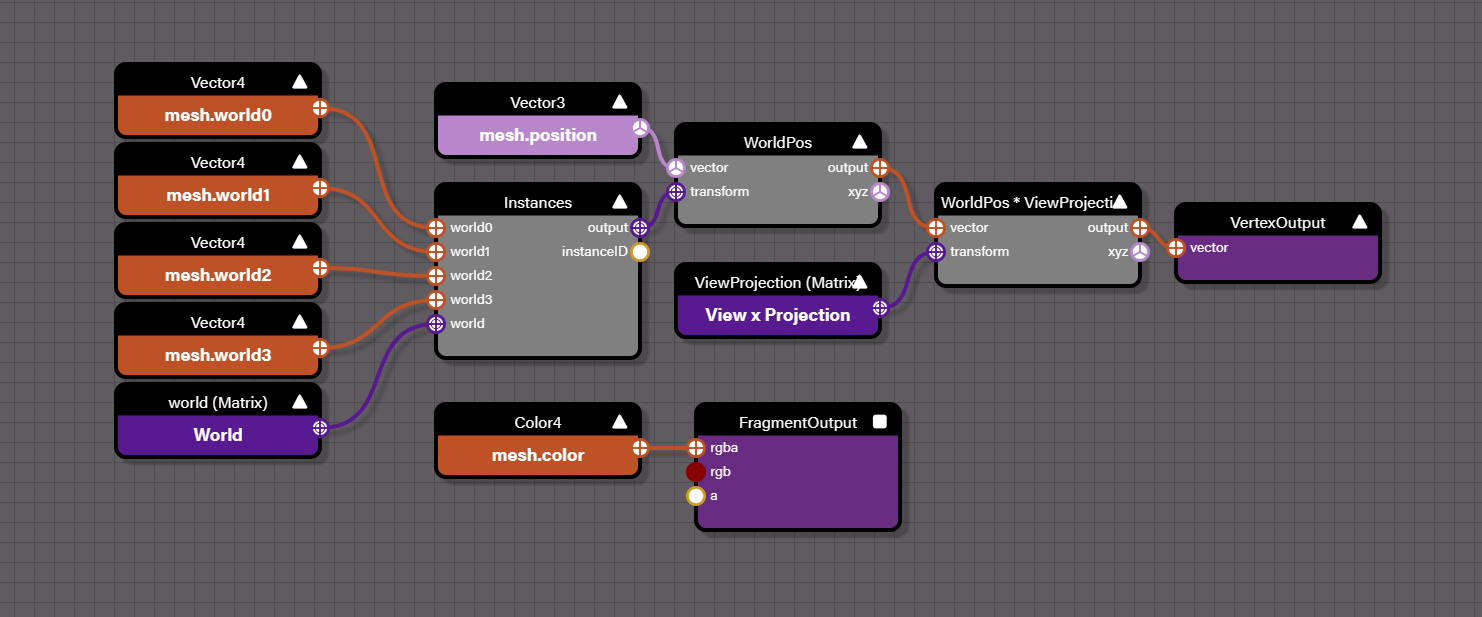
Example: Custom Buffers in Node Material
Advanced control
You can decide to control the world matrix instanced buffer the same way you control the custom buffers.
To do so, just run the following code:
mesh.manualUpdateOfWorldMatrixInstancedBuffer = true;When this mode is activated, you can update the world matrix instanced buffer with this code:
mesh.worldMatrixInstancedBuffer.set(mat, offset); // mat is the matrix you want to store at the given offsetoffset += 16; (a matrix is composed of 16 floatsIt is recommended to freeze the active meshes when controling the world matrix instanced buffer to avoid having a discrepancy between the values you store and the number of active instances:
scene.freezeActiveMeshes(true);You can find a complete example here: Instancing Advanced Control
Support
Instances are supported for collisions, picking, rendering and shadows. Even if the current hardware does not support hardware accelerated instances, babylon.js will be able to optimize rendering to take instances into account.
Starting from 5.0, instances that have a transparent material applied can be sorted from back to front to remove/limit rendering artifacts. This mode is enabled by setting BABYLON.Mesh.INSTANCEDMESH_SORT_TRANSPARENT = true.
Note that for performance sake the master mesh (the mesh from which instances are created by calling masterMesh.createInstance) is not taken into account in the sorting process. So, to avoid rendering artifacts between this mesh and its instances, this mesh should be disabled (masterMesh.setEnabled(false)).
Using 3D modeler to create instances
Blender
Using Blender, you can create instances of a mesh by just creating a linked object:

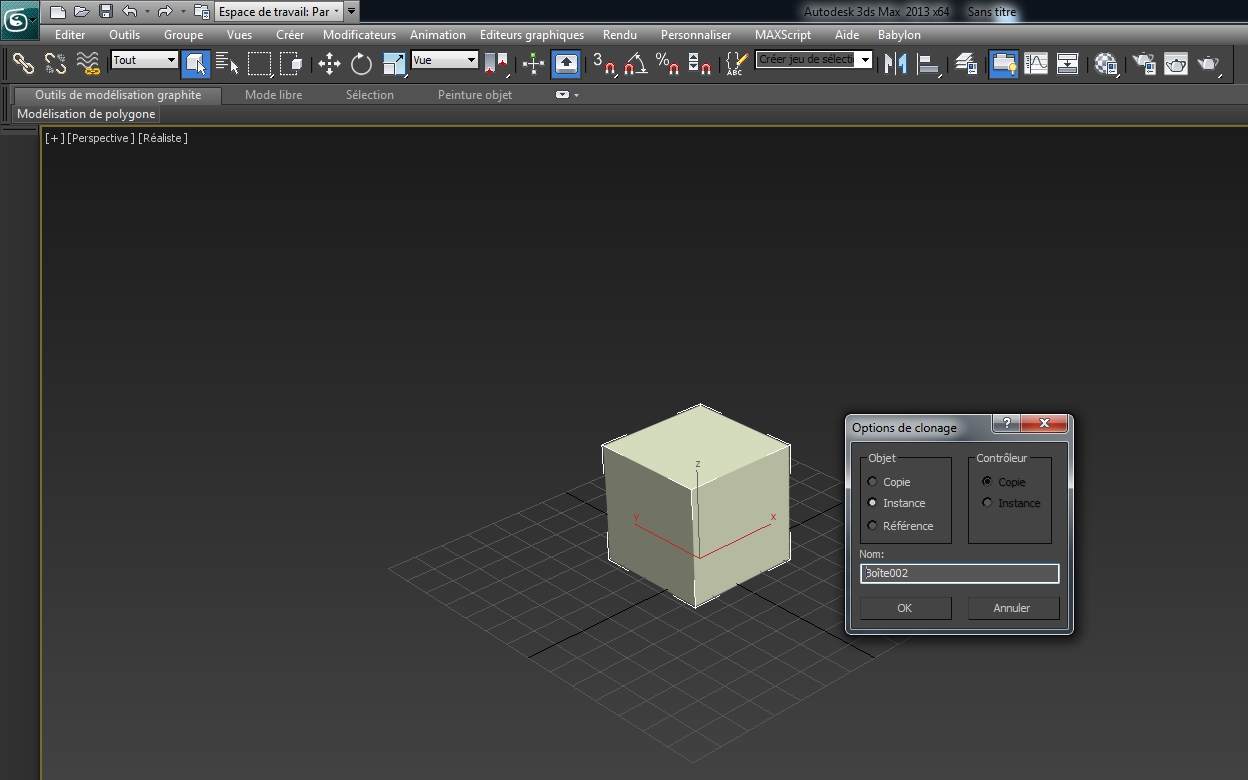
3DS Max
Using 3DS Max, you can create instances of a mesh by just creating a clone instance object with clic right on the object:
Limitations
-
You can use instances with LOD but one limitation will apply in this case: You will have to hide the root objects. Here is an example where LODs reuse instances:
Instances and LODs -
Instances with a world matrix where determinant is different than root mesh world matrix will be rendered separately (like a regular mesh). This mostly happens when the sign of the scaling vector is different between an instance and the root mesh.
-
When using motion blur, the engine needs to store world matrices of the previous frame to compute velocity. Usually, this part is taken care of internally, but in certain cases you may have to specify these matrices manually. You may in fact see weird blurring artifacts if you update your world matrix buffer manually (using
mesh.manualUpdateOfWorldMatrixInstancedBuffer = true;). In that case, to also update previous world matrices, you must enable the corresponding flag :
mesh.manualUpdateOfPreviousWorldMatrixInstancedBuffer = true;And similarly to world matrices, update the previous world matrices :
mesh.previousWorldMatrixInstancedBuffer.set(previousMat, offset);Here is an example of manual update of world matrices along with previous world matrices, to use motion blur correctly with instances :
Instances previous matrices motion blur